1. Overview
Commando Vision is an innovative digital media and social networking platform that combines video conferencing, live streaming, VOD, and messaging into one intuitive platform.
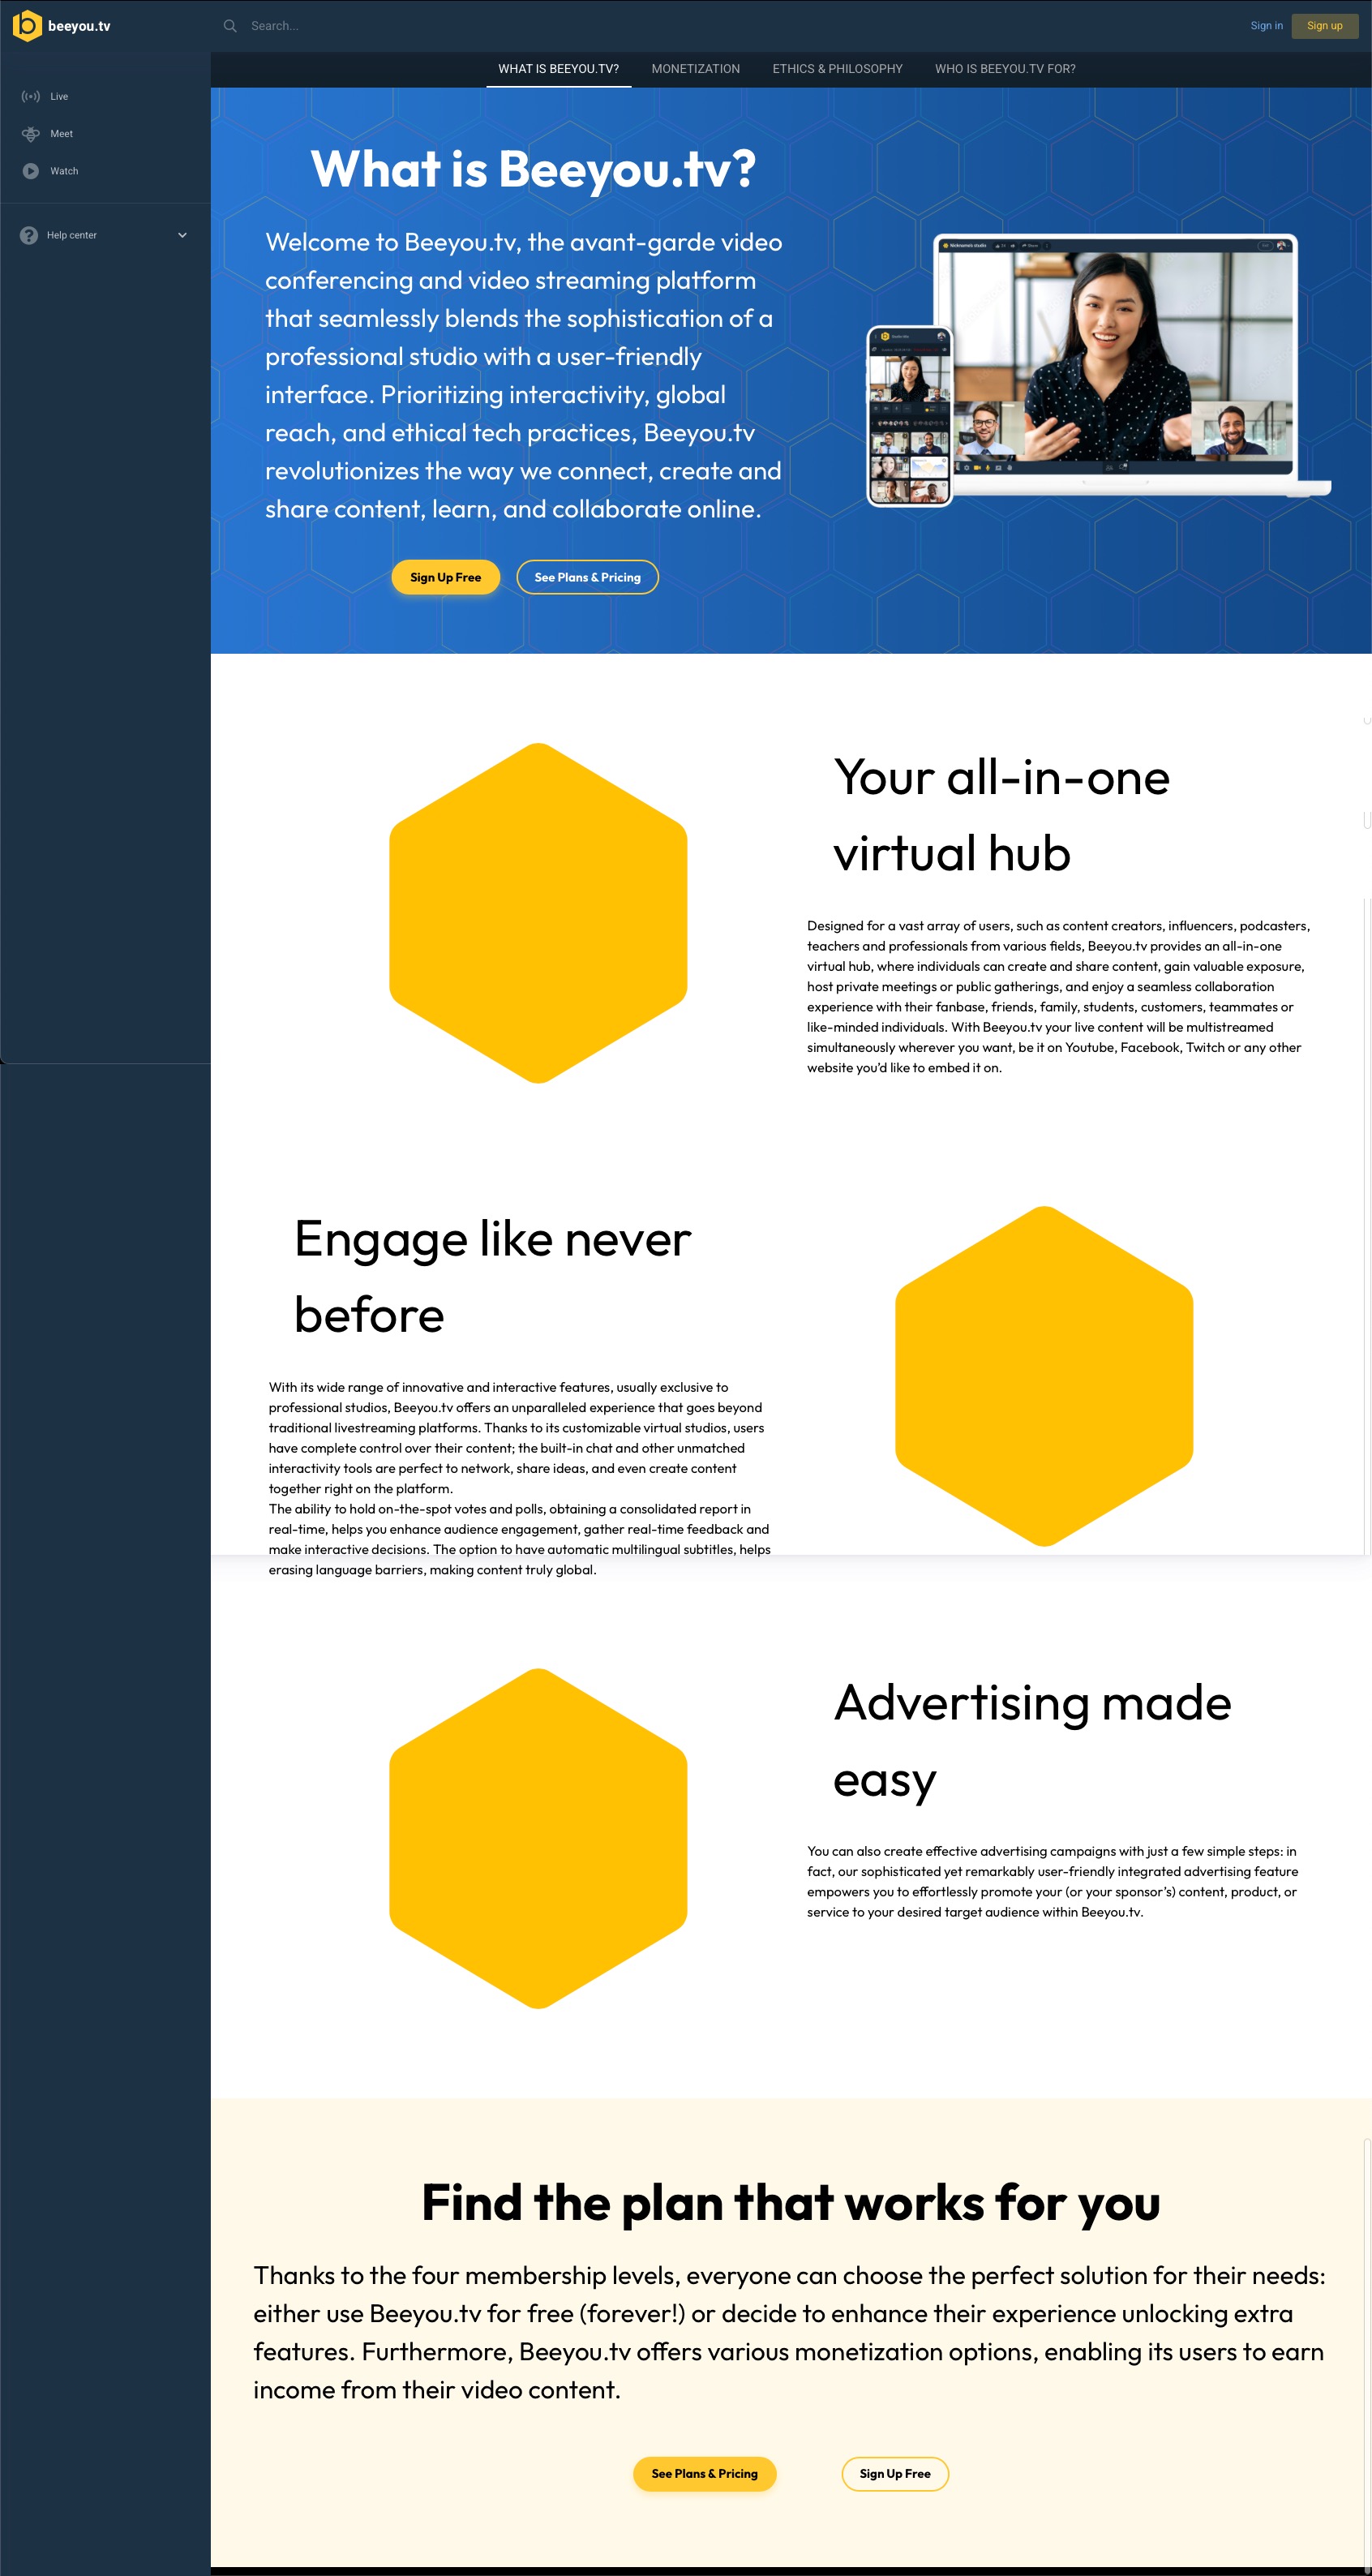
1.1. Signing Up
To sign up for Commando Vision:
Go to the Commando Vision homepage.
Click the sign-up Button on the top right.
Follow the steps to create an account.
1.2. Homepage
The Homepage offers various features:
Navigation Bar: Contains search, sign in, and sign up buttons.
Menu: Navigate to different content sections.
Footer: Access to the Help Center, legal notices, and theme settings.
1.3. Managing Your Channel
Your Channel is where your live events, VODs, and posts are displayed.
Opening Your Channel: Accessible through the account icon or the Homepage.
Profile and Background Image: Customize your Channel with a profile picture, biography, and background image.
1.4. Your Studio
The Studio is where you host events and manage content.
Entering Your Studio: Click the studio button on the Homepage.
Studio Layout: Divided into media library, broadcast area, and social hub/tools.
Broadcasting: Manage live events, record sessions, and stream content.
1.5. Making Money with Beeyou
Commando Vision allows content monetization through Pi points and Chips.
Earning: Host live events and offer VOD content for a fee or free.
Pi Points: Can be purchased, earned, and cashed out for real money.
Chips: Used for hosting studios or donating to others but cannot be cashed out.
2. Joining Beeyou
2.1. Signing Into Beeyou
To sign in to your Beeyou account, please follow these steps:
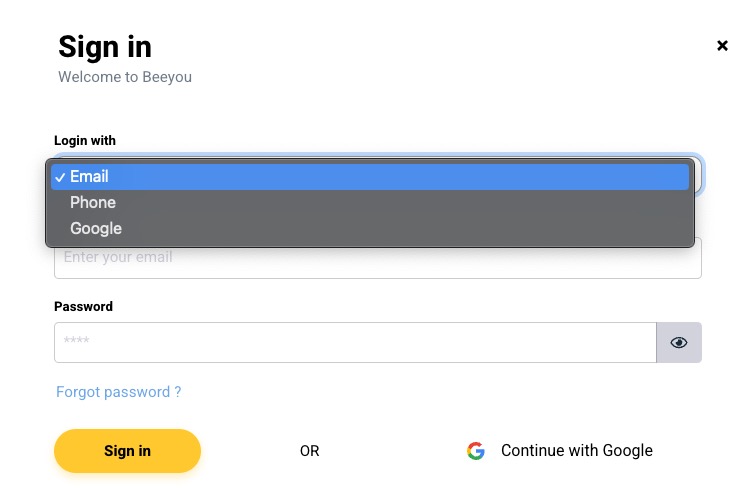
Open the Beeyou sign-in page.
Choose your login method: Email, Phone, or Google.
If you select Email, enter your email address in the designated field.
If you select Phone, enter your Phone Number in the designated field.
Enter your password in the `'`Password`'` field.
Click the Sign in Button to access your Account.
If you’ve forgotten your password, click Forgot password? to reset it.
Note: You can sign in with Google by clicking the Continue with Google Button. |
2.2. Creating an Account on Beeyou
To create a new Beeyou account, you have two options: for personal use or for an organization. Here’s how to sign up:
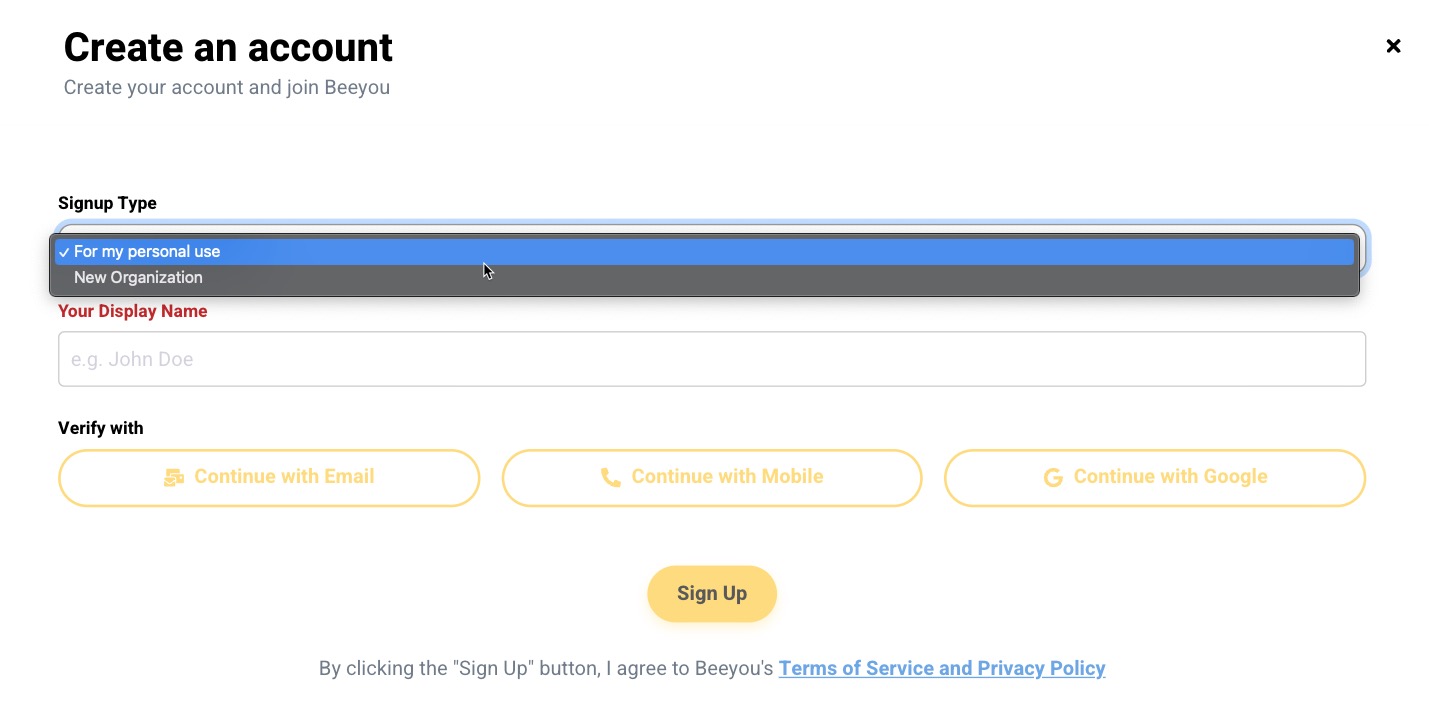
Open the Beeyou account creation page.
Select the type of Account you want to create: For my personal use or New Organization.
Enter your display name in the `'`Your Display Name`'` field.
Choose how you want to verify your Account: with Email, Mobile, or Google.
If you continue with Email or Mobile, you’ll need to verify your email address or phone number in the next step.
Note: You agree to Beeyou’s Terms of Service and Privacy Policy by signing up. |
2.3. Verifying Email or Phone for Beeyou Account
After choosing to verify with Email or Phone, you need to confirm your contact details:
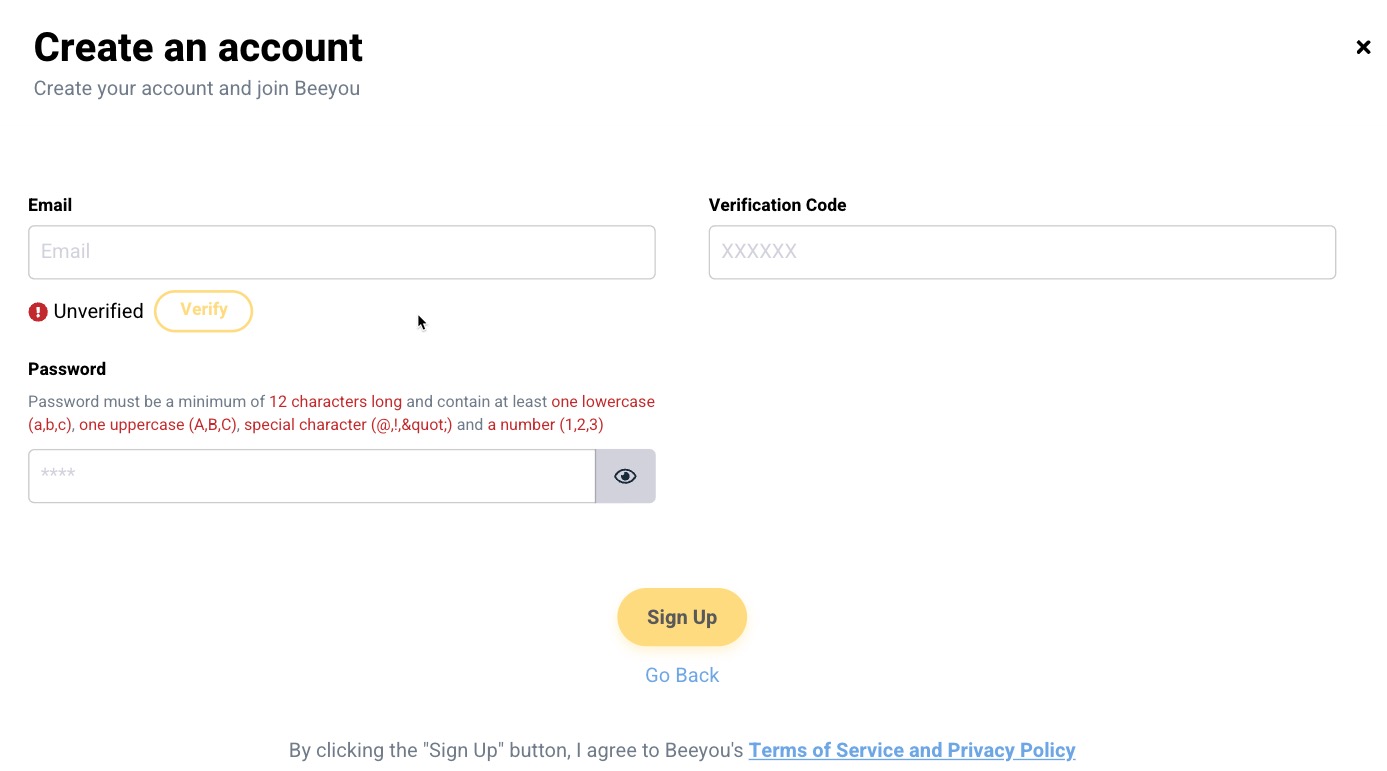
For Email verification:
Enter your Email in the `'`Email`'` field and click `'`Verify`'`.
Check your inbox for a verification code and enter it in the `'`Verification Code`'` field.
Create a password that meets the security requirements (12 characters long, with at least one lowercase letter, one uppercase letter, a special character, and a number).
Click `'`Sign Up`'` to complete the process.
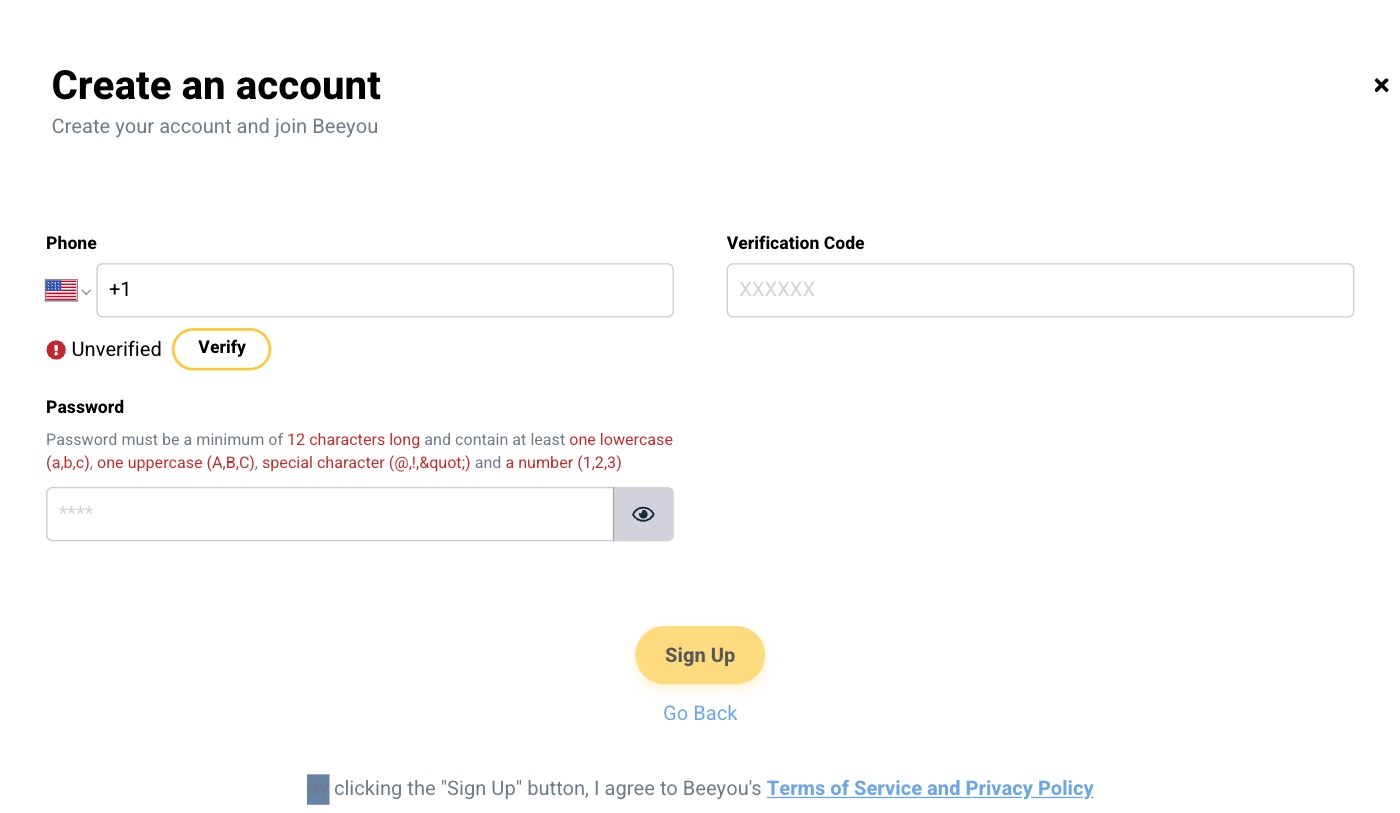
For Phone verification:
Select your country code and enter your phone number.
Click `'`Verify`'` to receive a verification code via SMS.
Enter the verification code in the provided field.
Set up your password following the same requirements as for email verification.
Click `'`Sign Up`'` to finalize your account creation.
2.4. Completing the Account Creation Process
Once you have verified your Email or Phone and set a password, your Beeyou account is ready. You can now sign in using your chosen method and explore Beeyou services.
Note: Remember to keep your password secure and do not share it with others. |
Commando Vision Homepage
Coming up live: This Section showcases upcoming live streams. You can view the schedule and set reminders for the streams you are interested in.
Meet: Here, you find a series of profiles you may want to connect or engage with. Hover over a profile to view more options.
Top: This area highlights the most popular or featured content on Commando Vision.
Organizations: Browse through organizations you can follow or get involved with.
Followed: This segment displays the channels and content creators you are currently following.
Suggested: Content suggestions are based on your viewing habits and preferences.
3. Navigation Menu
The sidebar on the left-hand side serves as the main navigation menu:
Start: Home button to return to the main dashboard.
Private Meeting: To create or join a private meeting.
Public Meeting: To schedule or join a public meeting.
Manager: Access management tools for your content and streams.
Calendar: View scheduled events and streams.
My Channel: Manage your personal Channel.
My Messages: View and send messages.
Libraries: Access your saved and uploaded content.
Analytics: Review analytics for your Channel and content.
Advertising: Manage or review advertising campaigns.
Settings: Configure your account and application settings.
4. User Profile and Settings
The user profile and settings can be accessed from the top right corner:
Messages: Check your messages.
Friends : View friend requests.
Following | Followers: Manage your following and followers list.
Account: Access account settings.
Membership: Review membership status and benefits.
Library: Access your content library.
Public Opinion Analysis: Engage with public opinion features.
Toggle Dark Theme: Switch between the dark and light modes
5. Additional Resources
Help centre: If you need assistance, the help centre provides support and FAQs.
Legal notice: View legal information and terms of service.
Settings: Access the settings menu directly from the bottom navigation.
6. Footer
The footer provides quick links to the help centre, user guide, terms and privacy, cookies policy, and an option to toggle the dark theme.
Commando Vision Studio Interface Guide
7. Overview
The Commando Vision Studio page is a comprehensive content creation, management, and broadcasting suite. It is divided into several panels and sections, each with specific functionalities for a seamless live-streaming experience.
8. Left Panel
+ Invite guests to the Studio via Email, SMS, link, or groups. + Set access requirements and permissions for participants.
+ Add custom messages when sharing your stream or inviting participants.
+ Manage and create new scene templates for your broadcasts. + Click the Create a new scene button to start setting up a new template.
+ Access your uploaded videos or Beeyou’s provided media for use in streams.
9. Central Panel
+ Visual representation of the current scene setup. + Click to Add functionality for adding guests and media to the scene. + Various editing tools for customizing the scene layout and settings.
10. Right Panel
+ Voting, drawing, picture-in-picture (PiP), zooming, and other interactive features. + Access to templates, playlists, and history for organized content management.
+ Real-time messaging area for communication with guests and viewers. + Text input field for sending messages during the broadcast.
+ Display the current session duration and time left for the broadcast.
11. Top Menu
+ End the current studio session.
+ Icons indicating studio mode, connection status, and user settings.
12. Bottom Menu
+ Manage the guests currently in the Studio.
+ Upload new media assets to be used in your broadcasts.
Commando Vision User Profile Page Guide
13. Overview
The user profile page on Commando Vision is personalized to showcase an individual’s content and activity. It features sections for the user’s media, posts, and broadcast options.
14. Header Section
User Avatar: Displayed prominently at the top of the profile.User Name: Your username is displayed underneath the avatar.
15. Content Section
+ This tab contains the user’s uploaded and shared videos.
+ Access live streams that the user is broadcasting or has scheduled.
+ This is where all the user’s posts are displayed.
+ Initiates a private meeting.
+ Begins a public live broadcast.
16. Right Sidebar
+ Displays the user’s pinned posts for easy access and high visibility.
17. User Interaction Section
+ Allows viewers to like the content.
+ Enables viewers to share the content on other platforms or with other users.
18. User’s Activity Stream
+ Previews of videos or other content the user has uploaded or shared.
+ This feature shows you how popular your content is by counting the number of likes and shares it gets. You can use this information to see how well your content is doing and make smart decisions about what to post next.
| Note: For more detailed interactions and viewing the content, click on the respective tabs or thumbnails. This guide serves as an initial walkthrough of the user profile page layout. |
Commando Vision Account Settings Guide
19. Overview
The account settings page on Commando Vision allows users to manage their personal information, account preferences, and channel settings.
20. Tabs for Account Settings
The default tab where you can update personal information.
Adjust account-specific settings like notifications and privacy.
Manage other users who can operate your Studio
Access a QR code linked to your Account or Channel.
Set your content and interaction preferences.
View and manage a list of channels you have blocked.
21. Details Section
+ Upload or remove your profile picture. + Apply Button to confirm changes.
+ Username: Displayed but cannot be changed. + Nickname: Editable field for your preferred display name. + Bio: Text area for a brief personal biography.
+ Email: Your registered email address. Options to verify or change. + Phone Number: Your linked phone number. Options to verify or change.
+ First Name: Editable field for your first name. + Last Name: Editable field for your last name. + Date of Birth: Dropdown menus to select year, month, and day. + Country of Residence: Use the dropdown menu to choose your country. + Zip Code: Field to enter your postal code. + Gender: Radio buttons to choose your gender identity. + Language: Dropdown to choose your preferred language.
22. Channel Settings
+ Main Category: Use the dropdown menu to select the main category for your channel. + Tags: Add or remove tags related to your channel content.
+ Checkboxes to select interests that align with your Channel’s content.
23. Save Changes
+ Cancel: Discard changes and exit the settings page. + Save Changes: Save any changes to your account settings.
| Note: Ensure all the information is correct and up to date before saving changes, as this may affect your Channel’s discoverability and the overall user experience. |
24. Settings Tab
You can update your Email and phone number and change your password here.
Your current email address. Click `'`Verified`'` to change or re-verify.
Input field for the verification code.
Your current phone number. Click `'`Verified`'` to change or re-verify.
Input field for the phone verification code.
Input field for your current password.
Input field for your new password.
Input field to confirm your new password.
Save the new password settings.
25. Operators Tab
Manage users who can operate your Studio.
The username of the operator.
The expiration date of operator access.
Remove operator access.
*Click to add a new operator to your Account.
26. QR Code Tab
Your personal QR code that links to your Channel for easy sharing.
The actual QR code image.
A direct URL to your Channel.
Save the QR code image for offline use.
27. Preferences Tab
Customize how you interact with the platform.
Switch between light and dark mode.
Dropdown to choose your preferred language.
Increase or decrease the font size.
Here, you can customize your notification preferences for different activities.
Toggle to receive push notifications.
Toggle to receive email notifications.
Toggle to receive SMS notifications.
28. Blocked Channels Tab
View channels you have blocked and the ability to unblock them.
The name of the blocked Channel.
Option to unblock the Channel.
29. Submitting Changes
For each Section, after making changes, be sure to click the `'`Save changes`'` or `'`Submit`'` Button to apply your new settings.
Commando Vision Membership Details Guide
30. Overview
The Membership section on Commando Vision provides an overview of the current subscription status, including the membership type and the specific features available to the user.
Commando Vision Pricing Plans Guide
31. Top-Level Account Tabs
The account management interface is segmented into several tabs, each serving a distinct purpose in the user’s Account and subscription management on Commando Vision.
This tab details the user’s current membership status, type, and the features available under their plan.
Here, users can view and compare different membership plans, understanding the costs and benefits associated with each tier.
Users enter and manage their billing information, which is crucial for transactions on the platform.
This Section records the user’s history of all transactions, such as earning and spending Pi points and chips.
Facilitates buying Pi points or advertising credits, which can be used within the platform for various services.
Users who earn Pi points through their activities on Commando Vision can convert these points into real-world currency and transfer them from the platform.
32. Membership Pricing Overview
The Pricing tab on Commando Vision outlines the different membership plans available, each with its features and benefits.
$0 per month, an entry-level option with limited features.
$19.99 per month, offering a balance between features and cost.
Allows users to subscribe directly to the Premium plan.
$99.99 per month for the most comprehensive feature set. Subscribed Indicator: This shows that the user is currently subscribed to the Pro plan.
33. Feature Comparisons
Each plan is detailed side by side for easy comparison, allowing users to decide which plan best fits their needs based on the features and limits provided.
34. Actionable Steps
Users can subscribe to the Premium plan directly from this page.
This shows This shows that the user is enjoying the Pro plan features.
Users on lower-tier plans can choose to upgrade their plan by selecting Pro and going through the subscription process.
| Note: It is essential for users to consider their usage and needs when selecting a plan to ensure they are getting the best value for their investment on the Commando Vision platform. |
35. Billing Overview
The Billing tab is designed for users to manage and input their billing information on Commando Vision. It is essential for processing payments and subscriptions and keeping a record of all transactions.
36. Billing Information
The name that will appear on invoices and billing documents. This field is required.
The user can input their company’s name for billing purposes if applicable.
The primary street address is associated with the user’s billing account.
Additional address information if needed.
Select or input the country for the billing address.
Input the postal code corresponding to the billing address.
Input the city of the billing address.
37. Invoices Section
Displays a message indicating the absence of invoices, meaning no billing has been processed or no subscriptions are currently active.
38. Actions
After entering or updating billing details, click this Button to save the information.
Discard changes and exit the billing details input form.
| Note: Accurate billing information is crucial for maintaining uninterrupted service and should be kept current. Users should review their billing details regularly, especially before new billing cycles or when changing subscription plans. |
39. Transactions Overview
The Transactions tab on Commando Vision gives users an in-depth view of their activity on the platform. This includes an account of points earned or spent, chips transactions, and a detailed description of each transaction.
40. Transaction Records
The Section displays a table that lists transactions in chronological order, showing the following columns:
The initiator of the transaction could be the user or Commando Vision for system-generated transactions.
The recipient of the transaction can be the user or Commando Vision, indicating where the points or chips are moving to or from.
The specific date when the transaction occurred.
Shows the number of Pi points used or received in the transaction.
Displays the number of chips that are used or received in the transaction.
Describe the nature of the transaction, for example, `'`STUDIO_CHARGE`'` for studio use fees or `'`AD_REWARD`'` for advertising-related earnings.
Provides an identifier for the resource related to the transaction, such as the specific studio session.
A brief explanation of the transaction, providing context to the user.
41. Account Balances and Actions
At the top, the user’s current balances of Pi points and chips are prominently displayed, along with an option to acquire more:
Shows the current balance of Pi points and chips, indicating how much the user has available on the platform.
If the user needs to increase their Pi points balance, this Button will lead to the purchase options.
42. Pagination and Navigation
The Interface includes tools for navigating through the transaction history:
Allows the user to select how many transaction records to display per page.
Users can navigate through pages of transactions using the provided pagination controls at the bottom of the Section.
| Note: The Transactions tab is essential for users to track and manage their financial activity on Commando Vision. It provides transparency and helps users keep an accurate record of their earnings and expenditures within the platform. |
43. Purchase Overview
The Purchase section on Commando Vision is designed to allow users to buy additional platform-specific credits, such as Pi points and advertising credits, which can be used for various activities and services within the platform.
44. Pi Points and Chips
Pi Points are used to start studio sessions and other platform functionalities.
Chips are used to start studio sessions and other platform functionalities.
Clicking this Button will open the payment tab to purchase PI Points t
45. Ad Credits
Are needed to create advertising campaigns on the platform.
This Button allows users to acquire more Ad credits.
46. Actions and Notes
To purchase Pi points, users can click the `'`Buy Pi Once`'` Button, which will guide them through selecting the amount and completing the transaction.
For buying Ad credits, the `'`Buy Ad Credits`'` Button will lead to a similar process where users can select the amount they wish to purchase.
47. Detailed Cash Out Section
The process is initiated once a user has met all the required conditions, which include account verification and the accumulation of a certain number of Pi points.
A checklist confirming the user has completed all necessary steps to be eligible for cash out.
Displays the current balance of Pi and chips, highlighting the user’s earnings on the platform.
A green checkmark indicates that the user’s profile has passed all verification checks, a mandatory step for cash out.
Informs the user whether there are any pending or completed cash-out requests.
Once clicked, it likely leads to a form where users can specify the amount they wish to transfer and provide bank account or PayPal details for the transfer.
48. Messaging Interface
48.1. Overview
This guide provides instructions on navigating and interacting with the messaging interface, as shown in the provided screenshot.
48.2. Sharing Your Status
To share your status, click the `'`Share your status`'` option near your profile picture at the top.
48.3. Accessing Different Sections
To switch between messages, notifications, and Slack integration, use the navigation bar at the top.
48.4. Adding New Messages
To add a new message, click on the `'`+ Add new`'` Button.
48.5. Joining a Conversation
To join an ongoing conversation, you may click on a chat that indicates `'`User has joined the conversation`'`.
48.6. Sending Messages
To send a message to a specific person, click on their name from the list and type your message in the chat box.
48.7. Notifications
Notifications such as an `'`invite`'` indicate new activity. Click on them to view the details.
48.8. Tips for Use
Ensure to check the timestamp of messages to follow the conversation timeline.
Library Interface Guide
49. Overview
This guide provides step-by-step instructions on how to use the media upload interface shown in the screenshot.
50. Navigation Tabs
UPLOAD: To upload new content.
VIDEOS: To manage your video files.
IMAGES: To manage your image files.
GFX: To manage your graphics files.
PLAYLISTS: To create and manage playlists.
SCENES: To manage scenes for your projects.
51. Selecting File Type for Upload
Normal: Use this option for standard uploads without special positioning.
GFX: Choose this if you need to position your images and videos precisely in the Studio.
52. Uploading a File
To upload a file, follow these steps:
Select the appropriate file type (Normal or GFX).
Click on the Choose Button or drag and drop your file into the designated area.
Note the maximum file size limit of 20.00 GB.
53. Tips for Use
Ensure the files you upload adhere to the maximum size limit.
Use the GFX option for files that require precise positioning within your studio projects.
54. Troubleshooting
If you’re unable to upload a file, check to make sure it doesn’t exceed the size limit and that it’s in a supported format.
User Guide for Survey Management Interface
55. Overview
This guide explains how to navigate and manage surveys within the `'`Public Opinion Analysis`'` Interface, as seen in the screenshot.
56. Interface Sections
SURVEYS: The main section where you can view and manage your surveys.
VOTE TEMPLATES: Access and manage pre-defined vote templates.
57. Managing Surveys
To create a new survey, click on the `'`Add New`'` Button at the top right corner.
Surveys marked as `'`Draft`'` indicate they are not finalized and can be edited.
To send a survey, click on the `'`Send`'` Button corresponding to the survey.
58. Survey List
Each survey entry shows the title and the number of responses received.
Use the icons next to each survey to perform additional actions like editing or viewing the survey details.
59. Pagination and Sorting
The Interface shows a set number of surveys per page, with pagination controls at the bottom.
To change the order of the displayed surveys, use the `'`Newest to Oldest`'` dropdown to select your sorting preference.
To navigate between pages, use the pagination controls.
60. Tips for Use
Regularly check the response count to gauge the engagement level of each survey.
Utilize the sorting feature to manage a large number of surveys efficiently.
61. Organization Profile Page
The Organization Profile Page allows you to manage and customize your organization’s public profile on the platform. Below are the steps and fields explained:
61.1. Profile Photo
Choose a file: Click to upload a new profile photo.
Remove photo: Click to delete the current profile photo.
61.2. Organization Information
Name: The official name of your organization.
Description: A brief description of what your organization does.
61.3. Contact Information
Email: Contact email for your organization.
Phone number: Contact phone number with country code.
Country: The country where your organization is based.
Zipcode: The postal code associated with your organization’s location.
61.4. Business Details
Business Name: The registered business name.
Business Type: Select the type of business from the dropdown menu (e.g., Enterprise).
61.5. Categories and Interests
Select a main category for your organization: Choose the primary category representing your organization.
Choose some tags for your organization: Select or search for tags relevant to your organization’s activities.
Interests: Check the boxes next to interests that align with your organization’s focus areas.
61.6. Logo
Choose a file: Click to upload your organization’s logo.
Remove photo: Click to delete the current logo.
61.7. Saving Your Profile
Make sure to click the Save button at the bottom right to apply any changes made to your organization’s profile.
62. Settings Tab
The Settings tab within the My Organization section is where you can manage how members interact with your organization. Here’s how to configure the settings:
62.1. Public Organization Join Settings
Allow anyone to join as MEMBER: Check this box if you want to allow any user of the platform to join your organization as a member without needing an invitation.
62.2. Save Changes
After adjusting your settings, click the Save button to ensure all changes are applied to your organization settings.
63. Members Tab
The Members tab is an important section for managing the users who are part of your organization. Here’s how to navigate and use the Members tab:
63.1. Current Members
The list shows all current members along with their roles, such as OWNER, CO-ADMIN, etc.
Each member has two action buttons next to their name:
Edit: To change the member’s role or details.
Disable: To temporarily disable the member’s access to the organization’s features.
63.2. Adding New Members
Click the Add Member button to invite new members to your organization. You will need to provide their username or email address and assign a role within the organization.
64. Invitations Tab
The Invitations tab lets you manage the invitations to your organization, allowing you to invite new members and keep track of pending invites.
64.1. Pending Invites
This Section displays a list of all the invitations you have sent that have not yet been accepted.
64.2. Invite New Members
To invite new members to your organization, you can use the following options:
Email: Send an invitation via email.
Sms: To send an invitation via SMS (if this feature is enabled).
Invite as: Choose the role you want the new member to have within the organization (e.g., MEMBER, CO-ADMIN, VIP).
Send to: Enter the email address or phone number of the person you wish to invite.
Message: Write a custom message that will be included in the invitation.
After filling out the invitation details, click the Send button to dispatch the invitation.
65. Roles Tab
The Roles tab within the My Organization section allows you to manage the roles that members can have within your organization. This includes creating new roles, setting a default role, editing existing roles, and deleting them if necessary.
65.1. Role Management
The list displays all the current roles, such as MEMBER (default), CO-ADMIN, and VIP, along with the following actions for each role:
Make Default: Set a role as the default role for all new members.
Edit: Modify the permissions or name of the role.
Delete: Remove the role entirely from your organization.
65.2. Adding New Roles
To add a new role, click the Add New Role button. You will be prompted to name the new role and set its permissions.
Be careful when changing role permissions or deleting roles, as these actions can affect the access and functionality of members within your organization.
66. Creating a New Role
When you need to create a new role within your organization, follow the steps outlined in the form on the `'`Roles`'` tab.
66.1. Role Creation Form
Role name: Enter the name of the new role you are creating.
Role description: Provide a brief description of what this role entails and the responsibilities associated.
66.2. Actions
Assign actions that users with this role will be able to perform within the organization. Options include:
Manage Organization: Ability to manage organization settings and profiles.
See organization balance: View financial and transactional information.
Start Studio: Start live sessions or broadcasts.
Upload VOD: Upload pre-recorded video content.
Feature on Homepage: Highlight content on the organization’s Homepage.
66.3. Payment Type
Choose whether the role is Free or Paid. For paid roles, specify if users will pay for their own studios.
66.4. Additional Settings
Check the option `'`Allow member join requests`'` if applicable for your organization type (e.g. if the organization is PUBLIC).
After filling out all the necessary information, click the Create button to finalize the creation of the new role. Use the Cancel button if you need to exit without saving changes.